Edit 2020: Trovate sul mio canale YouTube la videoricetta dei Croissant. Li ho realizzati utilizzando un’altra ricetta, tuttavia il video vi sarà utile per capire come fare la sfogliatura, come fare le pieghe a tre e a quattro e come formare i croissant.
Domenica scorsa ho fatto un “breakfast party” a casa, volevo testare la mia nuova planetaria cimentandomi in uno degli spauracchi della pasticceria lievitata: il croissant sfogliato. Altre volte ci avevo provato, ma di brioches sfogliate decenti avevo ottenuto “solo” i saccottini (qui la ricetta le cui dosi sono anche adatte ad essere impastate con la macchina del pane). Questa volta grazie a (chevelodicoafare) Montersino sono riuscita ad ottenere delle brioches straordinarie! In più (nonostante abbia sfamato 15 persone) ho stoccato in freezer una ventina di brioches crude, per cui per diversi we ancora potrò deliziarmi con croissant (e nastrine) appena sfornate e fragranti.
Last sunday I invited my friends for a “Breakfast party” and I made a lot of brioches and croissant! Yes! Croissant! One of the “bugaboo” of many housewifes and foodbloggers! I tried other times to made them, without success. I was only able to make this brioches (which was gourgeous too!) but not croissants. But this time, with Montersino recipe, I obtained this delicious brioches, I fed 15 friends and I stored a lot of (raw) brioches into the freezer!

Ne approfitto, per chi si fosse perso il precedente post per ricordarvi due cose: 1) Su youtube non sono più disponibili i video di Montersino, in quanto Peccator di Gola ha dovuto rimuovere dal proprio canale tutto il materiale non autorizzato (cioè tutto quanto andato in onda su Alice);
2) Sabato prossimo, se non ci sono imprevisti (anche metereologici) sarò a Lecce a seguire dal vivo una lezione di Montersino!!! Sino ad ora ve lo avevo taciuto anche un po’ per scaramanzia, ma……………… insomma! Sono eccitata quasi come in occasione del mio primo concerto dei Depeche Mode (ancora una volta chevelodicoafare).
I take the opportunity of this post to remember you that next Saturday I will assist to a Montersino Lesson here in Puglia! I am excited as I was before my first Depeche Mode live concert! And also that due to copyright issue there is no more the possibility to see Montersino video lessons on youtube.
Date queste premesse ne consegue che non potendovi più rimandare “comodamente” a dei video su youtube, quando si tratterà di ricette più complesse cercherò di fornirvi più foto, in questo caso per alcuni passaggi ho dovuto ricorrere a dei fotogrammi del maestro presi dai DVD di Accademia di Pasticceria. E vi prometto inoltre che la prossima volta che mi cimenterò nelle brioches sfogliate girerò un bel video! Bene ora passiamo ai fatti.
This means that I have to give you more photo-directions and video recipe, since I cannot link you any Montersino videolesson. For this recipe I also used some frames from Pastry Accademy DVD (of Montersino of course!). I promise you that next time I will also make a videorecipe!

Ingredienti (per circa 24 croissant grandi oppure 48 piccoli)
Ingredients (for 24 croissants or 48 mini croissants)
- 500g farina manitoba (American flour)
- 150g zucchero semolato (sugar)
- 75g burro (butter)
- 225g uova intere (eggs)
- 150g latte (milk)
-
20g malto in polvere* (malt powder)*
- 15g sale (salt)
Per il lievitino (for the starter) - 110g di acqua (water)
- 250g farina (io ho usato la 00) (flour, also all purpose flour)
- 35g lievito di birra** (brewer’s yeast)**
Per le pieghe (for folding) - 375g burro (butter)
Modifiche sulla ricetta (recipe amendaments)
*Io non ho aggiunto il malto – I didn’t add the malt.
** Io ho utilizzato solo 25g di lievito – I used 25g of yeast
FotoProcedimento (PhotoDirection):
1. Impastate il lievitino senza lavorarlo troppo, mettete la pasta in un contenitore con dell’acqua leggermente tiepida (circa 30°) e lasciate fermentare fino a quando la pasta sale a galla (circa 10 minuti). (Mix the starter ingredients and put the dought into a bowl with light warm water until it surface. About 10 minutes)
2. Nel frattempo in una impastatrice lavorate gli ingredienti dell’impasto eccetto il burro ed il sale. Le uova vanno unite uno alla volta. Unite dunque il lievitino e solo quando si sarà formato un impasto liscio ed omogeneo aggiungete il burro ammorbidito a pezzetti ed infine il sale. Importante: Il burro deve essere morbido come l’impasto. Non dimenticate mai il sale! altrimenti la lievitazione dell’impasto sarà irregolare. (In the meantime mix with a machine the flour, the sugar, and the other ingredients adding eggs little by little and leave apart butter and salt. Add the starter and when it is alla omogeneous add softened butter and salt.
3. Mettere l’impasto a riposare in frigo per almeno 4 ore oppure tutta la notte, coperto con pellicola (io l’ho lasciato 4 ore). L’impasto appena preparato risulterà un po’ molle, ma comunque non deve presentarsi liquido. (Let the dough rest into the fridge for a night or for at least 4 hours, covered with cling film for food. The dough will be very soft as you have prepared it.
4. Dopo il tempo di riposo stendere sulla spianatoia infarinata la pasta in uno strato abbastanza spesso cercando di ricavarne un rettangolo il più uniforme possibile. Sistemare al centro del rettangolo il burro che avete precedentemente appiattino battendolo con il mattarello tra due fogli di carta da forno. (After the dought rested, roll it into a thik rectangle. Put in the middle of the pastry the butter, shaped as a rectangle using the rolling pin and baking sheet)

Notare che la pasta deve rimanere piuttosto spessa, altrimenti durante la sfogliatura si romperà facendo fuoriuscire tutto il burro, rendendo impossibile la lavorazione! (As you can see, the pastry has to be thick, otherwise it would be difficult to roll out the pastry).

Ripiegare l’eccesso di pasta a “pacchetto” incassando il burro. A rigore il mio panetto di burro sarebbe dovuto essere più lungo ed arrivare sino a bordo della pasta, tuttavia è andata molto bene anche così!!! (Fold the butter with the pastry. Please note that the butter has to be high as the pastri is, I made an error!).

Importante: non accavallare i lembi di pasta, ma sigillarli avvicinando le due estremità. (Important: you have to “close” the pastry, not to put one plain part on the other! – See the picture)

5. Ora comincia la sfogliatura. Lavorate sempre con la parte delle pieghe rivolta verso di voi. Con il mattarello appiattire la pasta allungandola. Quando l’avrete appiattita iniziate a far rotolare il mattarello tenendolo in posizione orizzontale allungando la pasta. Date anche qualche mattarellata con il mattarello in posizione verticale in modo da ottenere un rettangolo il più regolare possibile. (And now start folding! Turn the dough so that the folded edges are to the up and down. Now press the pastry with the rolling pin, the roll it over. Try to mantain a rectangular shape).

Otterrete qualcosa tipo questo: si intravede sotto la pasta anche il burro assottigliato. (You will obtain something like that. I think you can also see the butter under the pastry).

6. Eseguire la prima piega a tre: piegare un lembo di pasta e risvoltarlo verso il centro. (Now fold in 3, envelope style, by bringing the plain part over the centre and the top third over).

Quindi sovrapporre sugli altri due strati l’altro lembo. I gesti sono due, la piega si chiama “a tre” perché otterrete tre strati di pasta, come in foto. Lasciar riposare in frigo per almeno due ore. Ripetere questa operazione per altre due volte, rispettando scrupolosamente i riposi tra una piega e l’altra, altrimenti vi sarà impossibile stendere la pasta senza farvi venire un esaurimento nervoso! (You will obtain three edges. Seal them by pressing with the rolling pin. Let the pastry rest in the fridge for at least 2 hours. Repeat this operation twice. The resting time is very important, without a rest you will be not able to roll out the pastry).

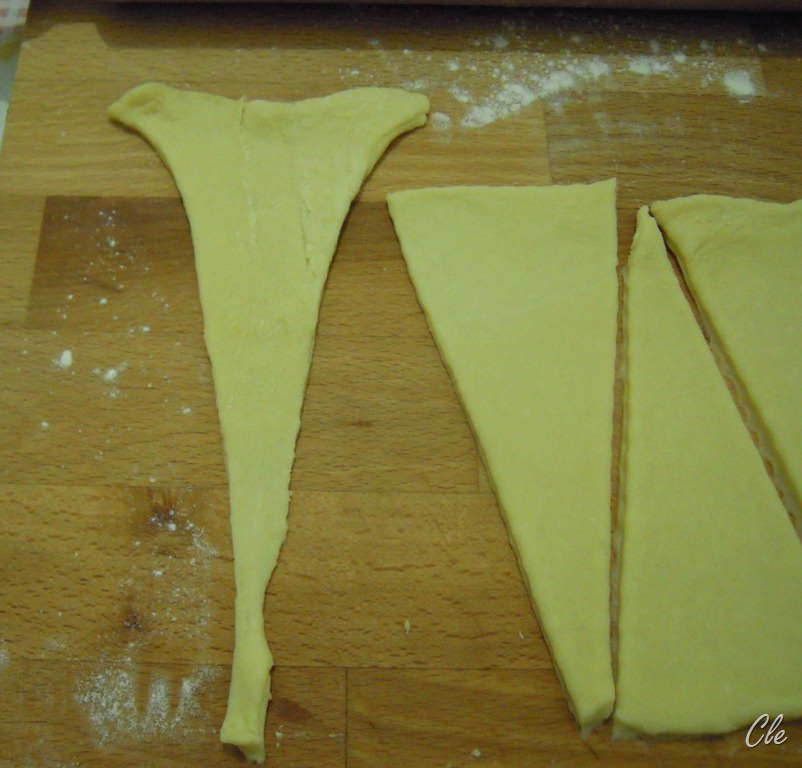
7. Esaurite le tre pieghe a tre, lasciate riposare la pasta più a lungo, almeno 4 ore, sempre in frigo, oppure tutta la notte. Stendete la pasta in rettangoli di circa 5 mm di spessore e ricavate dei dei triangoli alti almeno il doppio rispetto alla loro base. Con i triangoli in foto ho ricavato dei croissant di “taglia piccola”. (Roll into some rectangle the pastry, 5mm thick . From each rectangle cut 5 or 6 equals triangles. The triangles in the photo will be small croissant!)

8. Adesso prendete la pasta tra pollice ed indice della mano destra e passate la pasta tra pollice ed indice della sinistra, allungandola il più possibile (per questa fotosequenza ho attinto al video di Montersino). (Take the triangles between right hand thumb and forefingher and stretch them with other hand – see the photo).

9. Sistemate i triangoli di pasta allungata sul tagliere,e formate i croissant arrotolando la pasta partendo dalla base sino alla punta. (Put the triangles on the table and roll each one starting from the end opposite point).

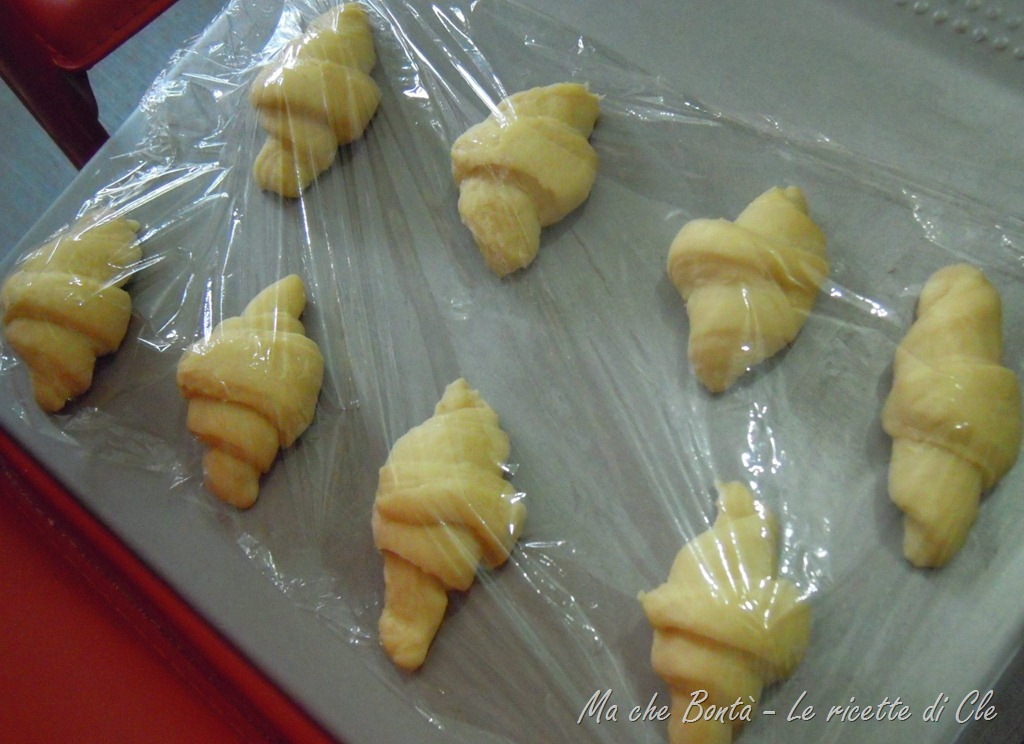
I cornetti così formati, a questo punto, prima della lievitazione, possono essere congelati. Basterà tirarli fuori dal freezer alla sera e lasciarli lievitare tutta la notte prima di infornarli al mattino. (You can store the croissant into fridge at this point. You have only to get them out at the evening, let them rise all night long).

10. Sistemare i cornetti su teglie leggermente imburrate, cercando di sistemare cornetti di dimensioni simili sulla stessa teglia, coprire con pellicola e lasciar lievitare tutta la notte (o comunque fino al raddoppio del loro volume). Quindi spennellare con tuorlo d’uovo e infornare (finalmente!): 180° per 15/18 min a seconda della grandezza. (Put the croissant on a ungreased baking tray, cover with food film and let rise for 3 hours or, better, all the night. Brush them with egg and bake in the centre of the oven, 425 °F for 20 minutes.
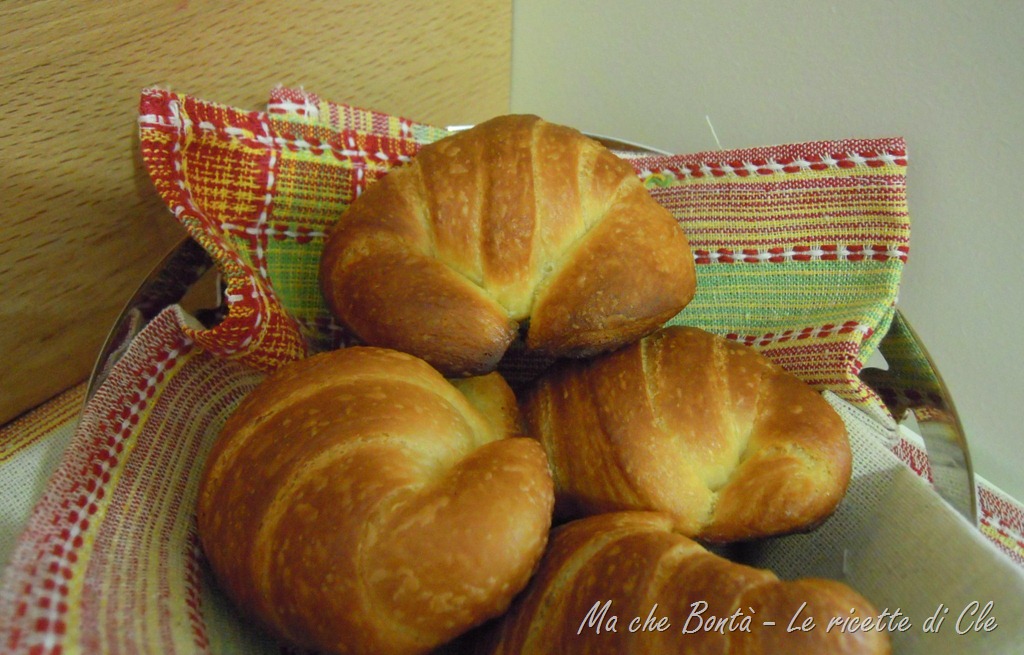
E dopo tanta fatica eccoli qua, croccanti fuori, soffici dentro, fragranti, buoni anche vuoti. (And after all this hard work, here they are, crisp outside, and soft in the middle. Serve them warm also filled with jam or custard).


Lo so, la lavorazione è lunga, ma tra un riposo e l’altro potete fare altro! E poi basterà dedicarci un week end ed avrete brioches per almeno 4 settimane, anche con la mezza dose qui proposta! Vi lascio solo una piccola anticipazione delle altre brioche che ho provato, i Kranz, che sono anche più semplici da realizzare, ve lo prometto! Qui la ricetta con fotoprocedimento. (I know it is a loooong recipe, but you can do something else while the pastry is resting! And with one and half working day you will have 40 croissants in your freezer, for every time you will have a delicious breakfast! The other brioches you see will be the guest stars of next post! See you soon!)

See also:


Scrivi una risposta a Cle Cancella risposta